
I have made a huge mistake
When the only tool in your toolbox is a hammer, everything tends to look like a nail. When I started working on the 8-Bit Ukulele, my main tool was the laser cutter at CRASH Space. I mean, the whole point was to make a laser cut ukulele, inspired by Ranjit Bhatnagar’s 8-Bit Violin.
A violin neck is a very different thing from a ukulele neck, and I struggled with how to make the neck for quite some time. In fact, I set the project aside for years because I was stuck on this one bit.
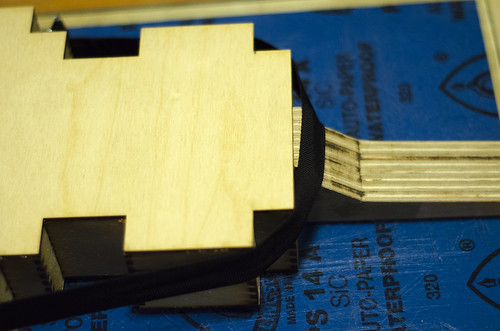
I ended up laser cutting birch plywood slices which I glued together to build up the neck. I designed two different length pieces and side bits which could make the square head design. It seemed like a slick solution. And, again, laser cutter.
Plywood is awesome. It’s multiple thin layers of wood, with alternating grain direction. Which gives it a tremendous amount of strength – when stresses are distributed across the layers.
I created “slices” of the neck in profile from the side. Which made a ton of sense from a design standpoint. And the neck is plenty strong for a soprano ukulele.
However the layers in the head are short and there are two problems.
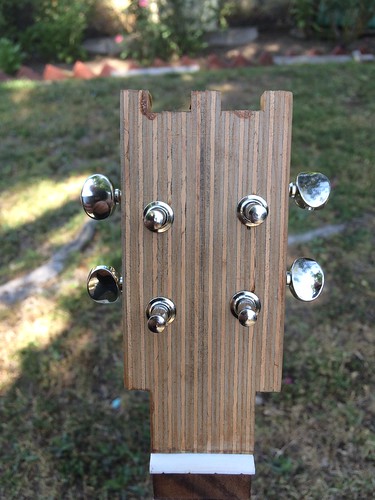
(Ignore the messy glue squeeze out mess. And the crooked tuner placement.)
Problem number 1: the grain fibers on the head are super short in the direction of the string tension. Again, it’s plenty strong for nylon soprano ukulele strings, so this isn’t a big deal.
Problem number 2: you have to drill holes in the head to install tuners. And these holes are going through the short fibers of the head, and between the layers of the plywood. Which is the weakest direction.
The holes have bushings press fit into them, which want to delaminate the plywood layers. The strings pull on the posts, which pull the bushing farther into the cracks.
The vibrating frequency depends on the distance and tension of the string between two fixed points. If the tuner posts move, the tuning of the strings won’t stay the same.
The plywood neck looks neat, but it’s one of the worst ways of making the neck of a stringed instrument. I am embarrassed when someone compliments me on it.
Ukulele necks are usually carved from one piece (or two joined pieces in some cases) of hardwood – traditionally Mahogany.
The CRASH Space toolbox added another tool between the time that I designed the 8-Bit Ukulele and I built it – a Shopbot CNC mill. I made the bridge on the Shopbot, and decided I would carve the neck of the next iteration of the uke on the Shopbot.
The files I made for the laser to cut the slices of plywood for the neck of the 8-Bit Ukulele won’t work for the ShopBot. For that, you need a 3D model.
I could have started over and designed the neck from the ground up in a CAD tool, but I figured it would be more representative to import the slice profiles into Autodesk Fusion 360, extrude them into the individual slices of plywood I cut, and then layer them together to make a 3D model of the neck.
I am no CAD master, and I’m still pretty much a novice with Fusion 360. So I probably did it all wrong, but one thing Fusion 360 does nicely is to make pretty renders.

I have a STL file which can be used for CNC milling. If you want the file for milling (or 3D printing) it can be downloaded from the files page.